
Privacy is an essential aspect of any home or property. Whether you live in a busy urban area or a...
Step by step instructions for an easy fence installation
Learn how to properly install a fence with these step-by-step instructions.
Choosing the Right Fence Material
When it comes to fence installation, one of the most important factors to consider is choosing the right fence material. The material you choose will depend on your specific needs and preferences. Some popular options include wood, vinyl, aluminum, and chain link. Each material has its own advantages and disadvantages, so it's important to do your research and select the one that best suits your needs. Check out our previous blog post about choosing between wood and vinyl fencing.
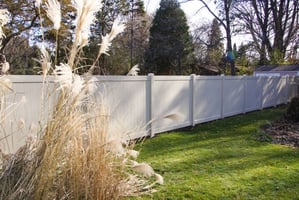
Wooden fences are a classic choice that offer a natural and rustic look. They can be customized in various styles and are known for their durability. Vinyl fences, on the other hand, are low maintenance and resistant to rot and fading. Aluminum fences are lightweight and durable, making them a great option for both residential and commercial properties. Chain link fences are affordable and provide security, although they may not offer much privacy. Consider factors such as aesthetics, durability, maintenance requirements, and budget when choosing the right fence material.
Preparing the Area for Installation
Before installing a fence, it's important to prepare the area to ensure a successful installation properly. Start by measuring the area where the fence will be installed to determine the amount of materials you'll need. Clear any debris or vegetation from the area to create a clean and even surface. If necessary, level the ground using a shovel or a rake to ensure the fence will be straight and secure.
Next, mark the locations where the fence posts will be placed. Use stakes and string to create a straight line to guide the installation process. It's also important to check for any underground utilities or cables before digging the post holes. Make sure to contact your local utility companies to mark the locations of any underground lines.
Additionally, check with your local building codes and regulations to ensure compliance. Some areas may require permits or have specific guidelines for fence installation. By properly preparing the area, you can ensure a smooth and problem-free installation process.
Setting the Fence Posts
Once you have prepared the area, it's time to set the fence posts. Start by digging holes for the posts using a post hole digger. The depth and diameter of the holes will depend on the height and type of fence you are installing. As a general rule, the holes should be approximately one-third the height of the fence.
After digging the holes, place the posts in the holes and ensure they are level and plumb. Use a level and a measuring tape to ensure accuracy. Once the posts are properly aligned, fill the holes with concrete or gravel to secure them in place. Allow the concrete to set according to the manufacturer's instructions before proceeding to the next step.
Setting the fence posts correctly is crucial for the stability and longevity of your fence. Take the time to ensure they are properly aligned and secured before moving on to the next step.
Installing the Fence Panels
With the fence posts set, it's time to install the fence panels. Start by attaching the panels to the posts using screws or nails. Make sure the panels are level and aligned properly for a clean and professional look.
If you are installing a wooden fence, you may need to trim the panels to fit the desired length. Use a circular saw or a handsaw to make the necessary cuts. If you are installing a vinyl or aluminum fence, the panels may come pre-cut to the desired length.
Once the panels are attached to the posts, secure them in place using brackets or clips. Double-check the alignment and levelness of the panels as you go to ensure a uniform appearance.
Continue installing the panels until the entire fence is complete. Take your time to ensure each panel is securely attached and properly aligned. This will contribute to the overall strength and appearance of your fence.
Finishing Touches and Maintenance
After installing the fence panels, it's time to add the finishing touches and perform regular maintenance to keep your fence in top condition. This may include applying a protective finish to wooden fences to prevent rot and decay, or cleaning and painting metal fences to prevent rust.
Additionally, consider adding any desired accessories such as gates, latches, or decorative elements to enhance the functionality and aesthetic appeal of your fence.
Regular maintenance is also important to ensure the longevity of your fence. This may include inspecting the fence for any damage, repairing any loose or broken components, and cleaning the fence regularly to remove dirt and debris.
By taking care of your fence and performing regular maintenance, you can ensure that it remains strong, attractive, and functional for years to come.